How to Decorate Vase at Home: Top Ideas for 2026
How to decorate vase at home starts with choosing a simple style, cleaning the vase well, and adding one or two materials that match your space, like paint, twine, ribbon, dried stems, or glass markers. We recommend keeping the design focused, so the vase looks intentional instead of cluttered.
Even a plain vase can feel custom with a few thoughtful details.
We found the easiest home vase projects work best when we match the vase to the room before decorating it. In our experience, color, texture, and shape matter more than complicated techniques. We recommend deciding whether you want the vase to blend in or stand out, then picking decorations that support that goal without fighting your furniture or flowers.
One tip most guides miss is to decorate with the vase’s final use in mind. If it will hold water, keep paint and embellishments mainly on the outside lower half or use waterproof finishes. If it is just for display, you have more freedom with layered textures. That small decision saves time, mess, and disappointment later.
A common mistake is thinking more decoration automatically means a better result. We have seen beautiful vases ruined by too many colors, heavy add-ons, or patterns that compete with the flowers. Less usually looks more polished. Another misconception is that you need expensive supplies, when simple household materials often create the most stylish, lived-in look.
Below, we will walk through easy ideas, materials, style options, and quick fixes so you can decorate with confidence. Whether you want something minimal or bold, we have practical ways to make your vase look finished, personal, and home-ready without making the project feel complicated.
In This Guide
- An Easy Way to Decorate a Vase at Home Without Overthinking It
- Pick a Look First: Minimal, Rustic, Colorful, or Modern
- What to Use to Decorate a Vase at Home: Paint, Twine, Glass Markers, and More
- Quick Comparison of Vase Decorating Ideas
- How to Match Your Vase Decor to the Room It Will Sit In
- Simple Fixes for Smudges, Crooked Lines, and Other DIY Mishaps
- Seasonal Vase Styling Ideas You Can Switch Up All Year
An Easy Way to Decorate a Vase at Home Without Overthinking It
Sometimes the best approach is the simplest one: choose one main material and repeat it neatly. We recommend starting with a plain glass, ceramic, or thrifted vase and adding either paint, twine, or removable decals instead of combining five different ideas at once.
That keeps the project manageable, usually under 30 to 45 minutes, and gives the finished vase a cleaner, more intentional look.
A reliable beginner method is to wrap the lower third of the vase with jute twine, secure it with clear craft glue, and leave the top portion plain. In our experience, decorating only 25% to 40% of the surface creates balance without making the vase feel busy.
If you prefer color, paint a single band, add simple dots, or use one muted shade like sage, white, or terracotta for an easy upgrade.
Before adding any decoration, it helps to clean the vase with rubbing alcohol and let it dry fully so glue or paint grips better. We suggest placing the vase where it will actually live, such as a dining table, shelf, or entry console, and matching the design to that spot.
When the setting guides the choices, decorating feels far less overwhelming and the result usually looks more polished.
Pick a Look First: Minimal, Rustic, Colorful, or Modern
Choosing a style first saves time and prevents the common mistake of mixing finishes that do not belong together. We recommend narrowing your direction to minimal, rustic, colorful, or modern before you open any paint or glue. That one decision shapes everything else, from color palette to texture.
In our experience, a vase project turns out better when there is a clear visual target instead of random inspiration.
For a minimal look, keep the vase mostly bare and use soft neutrals, matte paint, or a single stripe. A rustic style works well with twine, burlap, distressed finishes, and earthy tones like clay or olive. If you want something colorful, try bold floral shades, painted dots, or layered translucent glass markers.
A modern vase usually looks strongest with clean lines, black-and-white contrast, or geometric blocks.
Room context matters more than people expect. A bright multicolor vase may feel fun in a kitchen or craft room, while a bedroom often suits softer tones and simpler shapes. We suggest using the 60-30-10 rule: let the vase reflect the room’s main color family, add a secondary shade, then finish with one accent color.
That small design framework makes handmade decor look surprisingly cohesive without demanding advanced skills.
What to Use to Decorate a Vase at Home: Paint, Twine, Glass Markers, and More
The easiest materials to work with are the ones that match both the vase surface and the final effect you want. We recommend acrylic paint for ceramic or primed glass, glass markers for quick patterns, and jute twine for texture. Mod Podge, stencils, painter’s tape, faux pearls, dried pressed flowers, and peel-and-stick vinyl can also work well.
A basic project kit often costs under $15 to $25.
Paint gives the biggest visual change, especially if you use matte acrylic and seal it after drying. Twine adds warmth and hides scratches on older vases, which makes it especially useful for upcycling. Glass markers are ideal when you want removable-looking detail with less mess, such as leaf outlines, dots, or names for event decor.
In our experience, painter’s tape is one of the most helpful tools because it keeps lines crisp.
Not every material is equally practical for every vase. We suggest avoiding heavy embellishments near the rim, where water, stems, and frequent handling can loosen glue over time. For fresh flowers, keep decoration mostly on the outside and use water-resistant sealant if paint is involved.
The smartest material choice is not the fanciest one; it is the one that fits how the vase will be used, cleaned, and displayed day to day.
Quick Comparison of Vase Decorating Ideas
| Decorating Idea | Best For | Difficulty & Time | Key Tip |
|---|---|---|---|
| Painted vase | Modern, colorful, or seasonal rooms | Easy; 30-60 minutes plus drying | Use thin coats and let each layer dry fully to avoid streaks |
| Twine or rope wrapped vase | Rustic, coastal, or farmhouse styling | Easy; 45-90 minutes | Apply glue in small sections so the wrap stays tight and even |
| Decoupage vase | Vintage looks, floral themes, and gift projects | Moderate; 1-2 hours | Smooth paper outward with a soft brush to prevent bubbles and tears |
| Textured vase with baking soda paint | High-end neutral decor and sculptural displays | Easy to moderate; 40-70 minutes | Mix small batches for a consistent texture and apply with a stippling motion |
| Glass etching or frosted finish | Minimalist, elegant, and light-filled spaces | Moderate; 20-30 minutes plus rinse time | Mask the design carefully because crisp edges make the result look more expensive |
Choosing the right vase project gets much easier when we compare the look, effort, and upkeep side by side. Some ideas, like paint or rope wrapping, are forgiving and beginner-friendly, while others such as decoupage or etching need more patience.
In our experience, the best choice usually depends on where the vase will live, how often it will be handled, and whether you want a bold statement or a subtle finish.
For busy households, we recommend finishes that hide wear well. A textured painted vase tends to disguise fingerprints, small chips, and uneven brushwork better than glossy paint. On the other hand, a smooth glass or frosted finish can look stunning on a shelf that is mostly decorative.
The more visible the vase, the more the finish matters, especially in rooms with strong natural light or overhead lighting that highlights flaws.
Budget matters too, and most home vase projects can stay under $10 to $25 if you already have basic supplies like brushes, glue, or painter’s tape. We suggest matching the method to your confidence level rather than chasing the trendiest look.
A simple design done neatly almost always feels more polished than a complicated pattern with rushed edges, patchy coverage, or decorations that start peeling after a week.
How to Match Your Vase Decor to the Room It Will Sit In
The easiest way to make a decorated vase look intentional is to pull cues from the room around it. Start with the big three: color palette, texture, and shape. If the room has soft neutrals, linen, and pale wood, a chalky white or sand-textured vase usually blends beautifully.
In a darker room with black metal or walnut furniture, we recommend deeper tones like charcoal, olive, or matte terracotta for a grounded, cohesive feel.
Placement changes everything. A vase on a dining table is seen from all sides, so balanced patterns and full-wrap finishes work best there. For mantels, bookshelves, or console tables, the front view matters more, which means you can focus detail on one face or one side.
Scale is just as important as style; as a guide, a vase should often be about one-third to one-half the height of the surrounding decor grouping.
Different rooms also call for different moods. Living rooms tend to handle layered, expressive designs well, while bedrooms usually benefit from quieter finishes and softer colors. In kitchens, we suggest wipeable surfaces and simpler shapes that do not trap grease or dust. Bathrooms are a great place for frosted glass, pebble textures, or spa-inspired tones like sage and stone.
Matching the room is less about perfection and more about repeating a few visual cues consistently.
Simple Fixes for Smudges, Crooked Lines, and Other DIY Mishaps
Almost every DIY vase project hits a snag, and most problems are easier to fix than they first appear. For fresh smudges, act quickly with a damp cotton pad or microfiber cloth before the paint sets. If the mark has already dried, a light sanding with 220- to 320-grit sandpaper usually smooths it enough for repainting.
We suggest keeping touch-up paint nearby so corrections blend in rather than creating a second patchy area.
Crooked lines are common, especially with stripes, color blocking, or taped patterns on curved surfaces. A practical fix is to wait until the section is fully dry, then re-mask the edge with painter’s tape and paint a clean line over it.
For glue drips from rope or embellishments, trim hardened blobs carefully with a craft knife and cover tiny marks with matching paint. Rushing repairs usually makes them more visible, so patience pays off here.
If the whole vase feels off, step back before stripping everything down. Sometimes the problem is not the technique but the balance of the design. Adding a second stripe, extending texture lower, or painting the neck to match the base can make the piece look intentional again.
We recommend giving the project a full 24 hours before judging it, because wet finishes often look uneven while drying and settle into a far more polished final result.
Seasonal Vase Styling Ideas You Can Switch Up All Year
One of the easiest ways to keep a room feeling current is to update a vase with the seasons instead of redecorating everything around it. In our experience, a single glass, ceramic, or stoneware vase can take on a completely different personality with a quick refresh.
For spring, we suggest loose tulips, budding branches, or faux cherry blossoms in soft pink, white, and pale green to create an airy, just-opened-up look.
Summer styling works best when the arrangement feels a little brighter and less formal. Try filling a wide vase with lemons, limes, or seashells, then add a few stems like eucalyptus or sunflowers for height. Around fall, we recommend warmer tones such as rust, ochre, and deep burgundy, using dried grasses, wheat stalks, or mini pumpkins nearby.
A good rule is to swap just 2 to 3 elements each season so the display feels fresh without becoming fussy.
Winter is a great time to lean into texture and contrast rather than only holiday-specific decor. We found that clear or matte vases look especially polished with pine clippings, bare branches, white berries, or even a strand of battery-operated micro lights.
If you want a year-round system, store seasonal fillers in labeled bins and rotate them every 10 to 12 weeks. That simple routine makes vase decorating feel intentional, affordable, and surprisingly easy to maintain.
Frequently Asked Questions
How can we decorate a plain glass vase at home?
A plain glass vase is one of the easiest pieces to update at home. We recommend starting with glass paint, adhesive vinyl, twine, or small decorative stones. In our experience, cleaning the surface first helps everything stick better and look smoother.
A simple design, like frosted stripes, painted dots, or a wrapped neck, often looks more polished than covering the entire vase with too many materials.
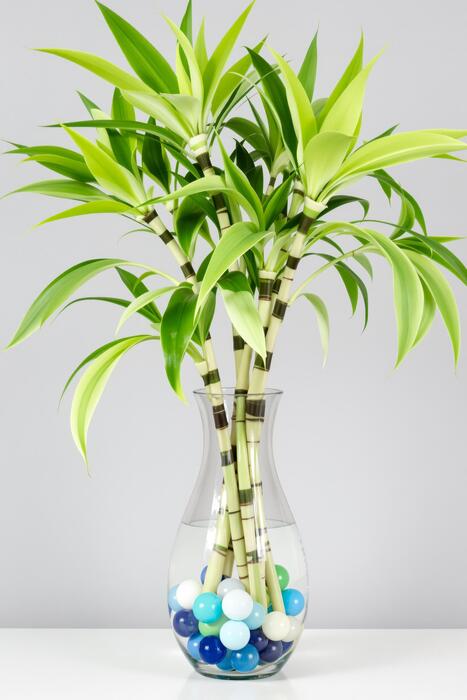
What can we put inside a vase for decoration without flowers?
There are plenty of attractive filler options when we do not want to use flowers. Popular choices include pebbles, fairy lights, dried stems, shells, marbles, beads, or seasonal items like pinecones and ornaments. We have found that mixing different sizes and textures creates more interest.
Clear vases work especially well for layered fillers, while ceramic vases look best with taller branches or a few sculptural decorative pieces.
How do we paint a vase without the paint peeling off?
To help paint last, we recommend washing the vase with soap, drying it fully, and wiping it with rubbing alcohol before starting. Using the right primer or glass-safe paint makes a big difference. In our experience, thin coats hold better than one thick layer.
Let each coat dry completely, and if the product instructions allow it, seal the finished design with a clear topcoat for extra durability.
What are easy DIY vase decoration ideas for beginners?
If we are looking for beginner-friendly projects, simple options usually give the best results. Good starting ideas include wrapping a vase with jute rope, adding removable stickers, painting a single color block, or tying ribbon around the neck. These methods need very few tools and are easy to adjust if something looks off.
We suggest choosing one material and one color direction to keep the finished vase neat and intentional.
How do we decorate a vase to match our home decor?
The easiest way to match a vase to a room is to repeat colors, textures, and finishes already in the space. For example, we often use neutral paint, matte finishes, metallic accents, or natural wraps depending on the room style.
In our experience, modern spaces suit clean lines and minimal detail, while rustic rooms look better with rope, distressed paint, or earthy fillers. Keeping the palette consistent helps everything feel connected.
Final Thoughts
Decorating a vase at home does not need to be expensive or complicated. With a few basic materials and a clear idea of the look we want, even a simple vase can become a stylish accent.
We have found that the best results usually come from choosing one strong technique, such as painting, wrapping, or filling, and keeping the design balanced instead of adding too many competing details.
If we are not sure where to start, it helps to pick one unused vase and test a quick idea first. A small update can build confidence and show us what works with our space. We recommend focusing on colors and textures that already appear in the room, then adjusting from there until the vase feels right at home.
Chloe Bennett is an interior stylist and ceramic enthusiast with a passion for curation. She specializes in finding the perfect vases to elevate home spaces, blending contemporary design with vintage aesthetics. Her expert guides help readers select, style, and care for unique vessels that transform ordinary rooms into art.