DIY Bud Vases Wedding 2026: Top Picks & Reviews
diy bud vases wedding is a simple, affordable way to create beautiful reception decor with a big visual payoff. Instead of one large centerpiece, we use a cluster of tiny vases filled with fresh blooms to add color, texture, and charm. It’s budget-friendly, flexible, and perfect for couples who want a polished look without overspending.
In our experience, this style works best when we plan the flowers around the table shape, venue lighting, and overall color palette. We found that bud vases can feel either effortlessly elegant or mismatched, depending on the details, so we recommend choosing a clear style direction before buying anything. Small choices make a noticeable difference.
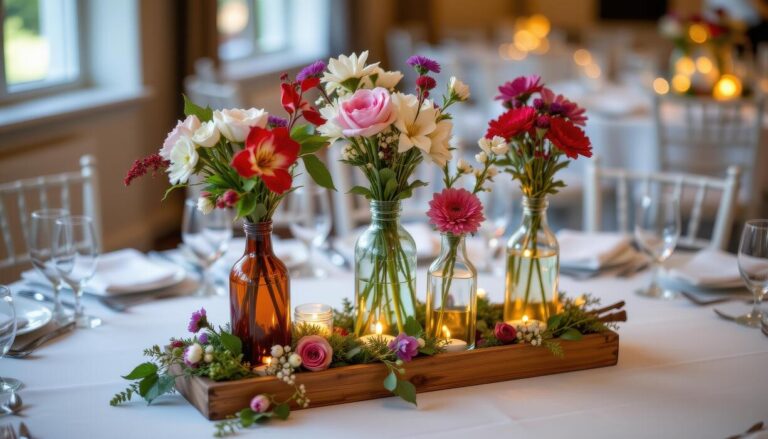
Here’s the insider tip most guides miss: the vase mix matters as much as the flowers. We recommend using a repeating palette of shapes and heights so the tables look intentional, not random. Even when the blooms change, a consistent glass style ties everything together and makes the whole arrangement feel professionally designed.
The biggest mistake with diy bud vases wedding is assuming “small” means “easy.” We often see people underestimate how many vases they need, how much time assembly takes, and how quickly costs add up if they buy everything last minute. The key is planning the full table picture, not just collecting pretty flowers.
If we want the finished result to feel cohesive, we need a clear plan, a realistic budget, and a few smart styling tricks. Below, we walk through everything from supplies to setup so we can create bud vase arrangements that look thoughtful, fresh, and completely wedding-ready.
In This Guide
The Complete Guide to Diy Bud Vases Wedding
A diy bud vases wedding setup is one of the easiest ways we can create a polished, romantic look without committing to large floral installations. By using small vessels and single stems or tiny clusters, we keep the design airy, flexible, and budget-friendly.
In our experience, this style works especially well for long tables, cocktail bars, welcome tables, and scattered accent spaces where subtle detail matters.
What makes bud vases so effective is their versatility. We suggest mixing glass, ceramic, clear, and colored vases for a collected look that feels intentional rather than matchy-matchy. A good rule is to repeat the same flower types in different heights and shapes so the arrangement feels cohesive.
Small-scale florals can still make a big visual impact when they are grouped thoughtfully and repeated throughout the venue.
For couples planning on a realistic budget, bud vases are often one of the most cost-efficient floral options. They reduce stem count, make transportation simpler, and allow us to spread flowers across the event instead of concentrating everything in one place. We recommend planning the layout early, then estimating how many vases each table or surface needs.
As a starting point, 3 to 5 bud vases per table usually creates a balanced look.
Everything You Need to Know Before Starting
Before we start collecting flowers and vessels, it helps to define the overall style, color palette, and table shape. Round tables usually need a tighter cluster, while long banquet tables benefit from a more linear arrangement with space between vases.
We suggest thinking about sightlines too: guests should still be able to talk across the table without weaving around a dense centerpiece. That practical detail makes a big difference.
Selection of flowers matters just as much as the vase choice. Stems like spray roses, ranunculus, lisianthus, waxflower, baby’s breath, and seasonal greenery are popular because they are petite, affordable, and easy to arrange. In our experience, flowers with sturdy stems and smaller blooms are easier for beginners to handle.
We also recommend buying a few extra stems for backup, since trimming and breakage can reduce usable material quickly.
Timing is another key factor. To keep flowers looking fresh, we usually recommend assembling bud vase arrangements 1 day before the wedding, then storing them in a cool space away from direct sun and heat. Water levels should stay consistent, and vase opening sizes should match stem thickness so the flowers stand upright.
If you prepare labels, tools, and a simple assembly station ahead of time, the entire process becomes much smoother.
Step-by-Step Breakdown
| Step | What We Do | Why It Matters | Typical Time |
|---|---|---|---|
| 1. Plan the layout | Map tables, bars, and accent areas before buying flowers. | Prevents overbuying and keeps the design balanced. | 30–45 min |
| 2. Gather supplies | Collect vases, snips, buckets, water, and flower food. | Having everything ready speeds up assembly. | 20–30 min |
| 3. Prep the flowers | Trim stems, remove excess leaves, and hydrate blooms. | Improves freshness and helps stems sit properly. | 45–60 min |
| 4. Arrange and place | Build each vase with 1–3 stems, then group them in sets. | Creates a cohesive look without overcrowding. | 1–2 hrs |
Start by measuring the spaces where the vases will go, then decide how many arrangements each area needs. We recommend sketching a quick floor plan or table map so the floral count feels deliberate instead of random. If the venue has long tables, evenly spaced clusters often look better than one large centerpiece.
This planning stage helps us avoid gaps, crowding, and last-minute stress.
Once the layout is set, prepare your materials in stations: cutting tools, water, towels, and sorted flowers. We suggest trimming stems at a diagonal and removing any leaves that would sit below the waterline, since that helps the blooms last longer. Keep the arrangements simple—usually one focal bloom, one supporting flower, and a light filler is enough.
Less really is more with bud vases.
After assembling, place the vases in groups and step back to check height, color distribution, and spacing. In our experience, the best look comes from repeating colors across the table rather than isolating them in one spot. Adjust the vases so tall stems don’t block conversation and shorter blooms create rhythm.
Finally, top off the water, store them cool, and transport carefully in trays or boxes to keep everything stable.
Common Mistakes People Make with Diy Bud Vases Wedding
One of the biggest mistakes we see is treating bud vases like an afterthought instead of part of the overall design plan. A scattered mix of shapes and colors can feel charming, but without a clear palette, the look quickly turns busy.
We recommend choosing 2 to 4 vase styles and repeating them throughout the tables so the arrangement feels intentional, cohesive, and polished rather than random.
Another common issue is underestimating scale. Small vases can disappear on long banquet tables, especially if the flowers are too short or too sparse. In our experience, the sweet spot is usually one to three stems per vase, with enough height variation to create movement.
We also suggest checking the arrangement from a seated guest’s perspective so the flowers enhance the table without blocking conversation or sightlines.
Timing is where many DIY plans start to unravel. Fresh flowers left untrimmed, unchilled, or arranged too early can wilt before the ceremony even begins. We found that a simple prep workflow makes a huge difference: store stems in water, trim them the morning of the wedding, and place the vases as close to event time as possible.
A little planning prevents a lot of last-minute stress.
Pro Tips That Make a Real Difference
Start with a strong color strategy, because that single decision can elevate the entire project. We recommend picking one dominant flower color, one secondary tone, and one soft neutral like white, cream, or blush. That formula makes even inexpensive blooms feel curated.
For extra depth, add texture with seasonal greenery, delicate filler, or a few stems of something unexpected, like waxflower or scabiosa.
Consistency matters just as much as variety. A useful approach is to build 3 to 5 vase “recipes” and repeat them across the venue instead of making every arrangement unique. In our experience, this saves time and makes shopping easier because you can buy stems in manageable batches.
We also suggest grouping vases in odd numbers, since clusters of 3 or 5 tend to look more natural and balanced on tables or mantels.
Small finishing details can make a surprisingly big difference. We recommend using clear floral tape, water tubes for delicate stems, and a clean pair of shears for sharper cuts. If you’re working with multiple tables, label each vase grouping by table number before the flowers arrive. That keeps setup fast and reduces confusion.
The best DIY décor usually looks effortless because the prep behind it is so organized.
Frequently Asked Questions About Diy Bud Vases Wedding
How many bud vases do we need per table? It depends on the table size and the look you want, but a helpful starting point is 3 to 7 vases for a standard round table and 5 to 9 for a long banquet table.
We suggest balancing the florals with candles or other décor so the table feels full without becoming crowded. The goal is a collected look, not visual noise.
What flowers work best for DIY bud vase arrangements? Smaller blooms with sturdy stems are usually the easiest to work with. We often recommend spray roses, tulips, ranunculus, lisianthus, waxflower, and seasonal greenery because they hold up well and fit the scale of bud vases.
If you want maximum value, choose flowers that open gradually over 24 to 48 hours, so the arrangements continue looking fresh throughout the wedding day.
Can we make bud vase arrangements the day before? Yes, but it depends on the flower type and storage conditions. We suggest preparing hardy blooms the day before and keeping them in a cool, dark space with fresh water until setup. Delicate stems are better trimmed and arranged closer to event time.
If you’re using a lot of fresh flowers, aim for a setup window of 2 to 4 hours before guests arrive to keep everything looking crisp.
Frequently Asked Questions
How many bud vases do we need for a wedding?
We usually recommend starting with the size of the tables and the look you want. For DIY bud vases wedding decor, a small round table may need 3 to 5 vases, while a long farmhouse table may need 8 to 12 spaced down the center.
We’ve found that grouping odd numbers creates a more natural, balanced look without overcrowding the table.
What flowers work best in bud vases?
The best flowers for bud vases are small, sturdy blooms that hold their shape well. We often suggest roses, spray roses, ranunculus, carnations, lisianthus, waxflower, and baby’s breath. Greenery like eucalyptus or ruscus also works beautifully. In our experience, mixing one focal flower with filler stems keeps the arrangement simple, affordable, and easy to style in narrow vases.
How do you make DIY bud vase arrangements for a wedding?
We recommend trimming stems to different heights, then placing one to three stems in each vase for a clean, intentional look. Start with the larger blooms first, add filler flowers, and finish with greenery if needed. For a polished result, keep the vase shapes similar or use a coordinated mix.
This approach makes DIY wedding bud vases look cohesive without needing professional floral skills.
How far in advance can you make bud vase arrangements?
We’ve found that most bud vase arrangements can be made the day before the wedding if the flowers are kept in water and stored in a cool place. Some hardier blooms may last longer, but delicate flowers are best arranged as close to the event as possible.
If time is tight, prep the vases and trim stems a day ahead, then assemble everything on the wedding morning.
How do you keep bud vase flowers fresh for a wedding?
To keep flowers fresh, we suggest using clean vases, fresh water, and sharp shears for trimming stems. Remove any leaves below the waterline and store arrangements in a cool area away from sunlight and heat. If possible, add floral preservative to the water. For better results, we also recommend refreshing the water shortly before the ceremony or reception.
Final Thoughts
DIY bud vases can be one of the easiest ways to create elegant wedding decor without a large floral budget. We’ve found that the key is keeping the arrangements simple, repeating a few flower varieties, and using thoughtful placement.
When the vases are grouped well and the stems are trimmed to the right height, the whole setup feels polished, romantic, and intentional.
If you’re planning your own DIY bud vases wedding look, we recommend starting with a small sample arrangement before buying flowers for the full event. That gives us a chance to test vase sizes, color combinations, and stem counts. From there, the process becomes much easier, and the final result feels beautifully personal.
Chloe Bennett is an interior stylist and ceramic enthusiast with a passion for curation. She specializes in finding the perfect vases to elevate home spaces, blending contemporary design with vintage aesthetics. Her expert guides help readers select, style, and care for unique vessels that transform ordinary rooms into art.